Welcome to Avarice
Welcome to the one-stop shop for documentation on Avarice.
What is Avarice?
Avarice was/is developed by Ouroboros Creations, which was founded by a small group of seniors at Champlain College. It is a four-player online or local couch competitive game,in which players compete to collect as much as they can. To collect (points), they must find Greed to become the embodiment of Greed and destroy the world around them. If someone else is already embodying Greed, the three other players must work together to take them down.
Using the docs
You can use these docs as a guide to develop content for the game. A good place to start is Project Setup.
Unreal Engine 4
Avarice uses Unreal Engine 4.20.3 with plugins:
- Gameplay Ability System (GAS)
- Advanced Sessions (ASess)
- Your Own Games User Reserach Toolset (YOGURT)
Project Setup
Install Unreal Engine 4
- Get the Epic Games Launcher

- Install UE 4.20.3
This will take a while, so I recommend also starting the next section while this is installing.

Install Visual Studio 2017
You will need to install VS2017 in order to build the project files. The UE4 docs on the subject can be found here.
All of the following can be found in the link above.
- Install Visual Studio ‘Community 2017’ from https://visualstudio.microsoft.com/vs/
- Select the right options for a new Visual Studio installation
“To add C++ tools to your Visual Studio installation, make sure you select Game development with C++ under Workloads.”

“To include the UE 4 installer when installing Visual Studio, locate the Summary sidebar on the right, expand Game Development with C++, and under Optional make sure the box for Unreal Engine installer is checked.”

The UE4 doc has some recommendations on the settings of Visual Studio, but for most developers, this is not relevant.
Visual Studio also taks a while to install, so it is recommended that you continue onto the next step before these two finish.
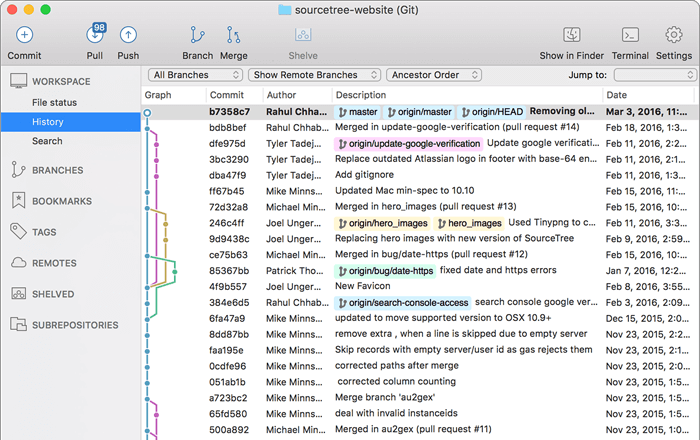
Install SourceTree
While Unreal Engine 4 and Visual Studio 2017 install, it is time to setup our repository.
- Install SourceTree
Go to https://www.sourcetreeapp.com/ and download the latest version for your platform (likely Windows). When you open the installer, if it doesn’t prompt you to log in with an Atlassian or Bitbucket accound, then please go to the Download Archives and download version 2.6.9.0. Some PCs have issues with the automatic download.
Clone the repository
Now that source tree is installed, it is time to clone the repository. Basically, we need to make a local copy of the files that are in pineapple so we can modify them and send them back to pineapple later.
- Get the repository URL
When you clone the repository, make sure you are using the right URL. These URLs can also be found on the Pineapple page.
Most users will use https://username@pineapple.champlain.edu/capstone-2018-19-t5.git (make sure to replace username with you Champlain first.last username). For those using SecureShell: ssh://git@pineapple.champlain.edu/capstone-2018-19-t5.git.
- Select Clone

- Input the URL from step 1, and set your desired destination
Make sure to tell sourcetree where the repository is coming from (the url from step 1) and where on your disk drive you want to put it. The folder where it is going must be empty. I am using the ssh url in this example, but you can also use the https url. If using https, you should see a prompt appear when you click out of the url field prompting you to enter your pineapple username and password.

Generate Project Files
Now that the repository is cloned, UE 4.20.3 is installed (and uproject files associated with Unreal Engine), and Visual Studio 2017 is installed, it is time to open the project.
But wait - alas there is no Visual Studio solution. Unreal Engine will fail without that!
All you need to do is right click on the uproject file and select “Generate Visual Studio project files”.

Build Binaries
Finally, Unreal Engine 4 can builds its binaries. These are all the files that are build from the assets in the project to make sure it runs. All you need to do is double click the uproject file, and Unreal Engine knows whether or not it needs to build binaries. If it does, you’ll just have to give it permission when you see the prompt below (click yes).


Content
Client Owner
All of these files are only present on the local client. Local clients are called Client Owners because each client is going to have some representation on the server, and thus each client “owns” something on the server (they control it).
Server
These classes are ONLY present on the server (or host).
BpGameMode
Format: Blueprint Parent Class: SrcGameMode
Description
Defines the rules/flow of actions.
ONLY Present on the server, since servers are dictative to clients. Clients will never have different rules than the server and should not know what these rules are.
See UE docs for more info.
Server and Client Owner
TODO
Tutorials
Tutorial: Stage Act
Alight, its time to make a new player character. Stage Acts are different roles a player can choose to play as (like the different characters in Overwatch or League of Legends or any RPG).
Make the subclass
- Find the PlayerCharacter blueprint class
See ServerAndClients/Entity/Player/BpPlayerCharacter
Make a subclass (put it in the same folder)
Name it BpAct<act name> (i.e. BpActDangerous)
Add to the data table
TODO: We do not currently support multiple stage acts. Please complain to Dustin.
Changing stats
Now that you have created and cataloged the subclass, do a trail run and make sure the character works.
Once the character is testable, it is time to explore what we can change about the character/stage act. Please explore the content page on PlayerCharacter.
Tutorial: Player Action
- abilities tutorial
- link to training
- add gameplay ability
- tags & what do
- cooldown
- applying effects
- spawning actors
- commiting, cancelling, and ending
- add effect
- cooldowns subpage
- duration
- tags
- stat modification
- add cue
- tags table & full explanation
Tutorial: Destructible
- destructibles tutorial
- import mesh
- make destructible
- tweak settings
- create blueprint instance of destructible
- set mesh & options
- put in world
Tutorial: Level
Why hello there!
If you are reading this document then that means you have been tasked with making your own Casino! We hope that this document will help you create one within the guidelines we have, and maybe just maybe avoid some taxes the government will put on your Casino.
One of the questions that may get asked preemptively about this is “Why is the Level pipeline set up like this, Conor is not a Level Designer?”. To answer that question, I did have a Level Design component to my internship while I was abroad in the spring. I have taken the industry style pipeline they had and we are literally using it the exact same in our game. Trust me, once you understand it you and the artist who is helping you will love it!
Builds
Checklist
- Match countdown = 20s (/Server/Game/BpGameMode -> Class Defaults -> Match Countdown Timer)
- Greed health is appropriate (/ServerAndClients/Game/BpGameState -> Class Defaults -> Gameplay -> Antagonist -> Antagonist Max Health)
- Background music enabled (value = 0.75) (/ClientOwner/Audio/CueBackground -> Sound -> Volume Multiplier)
- Stage Acts are properly set (/ServerAndClientOwner/Entity/Player/BpPlayerController -> Class Defaults -> Character)
- Class Act = BpActDangerous
- Class Antagonist = BpActAntagonist
- Class Default = BpPlayerCharacter
- Class Spectator = BpSpectatorPawn
- Stage Acts have abilities (/ServerAndClients/Entity/Player/BpAct* -> Class Defaults -> Abilities)
- Actions -> Ability Movement
- Actions -> Ability Primary
- Actions -> Ability Secondary
- Actions -> Ability Special
- Actions -> Ability Ultimate
- Actions -> Ability UltimateAntagonist
Make a Build
Making a build in Unreal is called Packaging. To prep the project for packaging/building, there are a couple things that must be tweaked.
Version Bump
When making a build, the version bump is imperative. Avarice follows Semantic Versioning (SemVer). The version contains 3 VINs (very important numbers) which equate to MAJOR.MINOR.PATCH:
Given a version number MAJOR.MINOR.PATCH, increment the:
* MAJOR version when you make incompatible API changes,
* MINOR version when you add functionality in a backwards-compatible manner, and
* PATCH version when you make backwards-compatible bug fixes.
That is taken straight from SemVer. For us, given a version number MAJOR.MINOR.PATCH, increment the:
- MAJOR version when you make a large game overhaul, project change, or introduce a new system
- MINOR version when you add functionality
- PATCH version when you make bug fixes only
If you increment a larger version number, all of its children change to 0. Example: If I have a version 1.6.2 and I introduce new functionality to a pre-existing system (say I added 2 abilities), I would bump the version number to 1.7.0. If I discover a bug in the next QA session, go and fix the bug, and make another build, the version would be bumped to 1.7.1. Then, I add a whole new system, say Steam Achievements. The version now gets bumped to 2.0.0 on the next build.
The project version is stored in Project Settings in Unreal Engine.

The project version is under the project description category.

QA Build Repo
All builds must be tested, and most builds will be tested through QA. For QA at Champlain College, this involves putting each build in the build repository. CCM Lab computers already have this repo in the C-drive, but if you dont already have the repository, you can run the buildRepoClone.bat script in the project repository to clone the SVN repo.

Make sure to choose a custom depth for just our project - we dont need to pull down everyones project files.

Once you have cloned, we should make a space for our new build. Go ahead and make a folder in the build repo under our project with your new build version. (for version 1.7.1, I’d make a folder capstone/capstone-2018-19-t5/1.7.1).

Packaging
Now we can go back to Unreal, and start packaging the build.

Be sure to select our new folder as the destination folder. This will put Unreal Engine’s WindowsNoEditor folder in our version folder (or something else if you aren’t doing a development build).

Tada, it is building (packaging)!

Tag the commit
Now that we have made a build, we need to make sure the build is tagged in the repository.
If you are making a stable tested build, make sure to merge into the master branch of the repository. CAREFUL, master should ALWAYS be stable!
Tags should be formatted as vMAJOR.MINOR.PATCH
Push & Upload
Now the build has been built, and we have tagged the appropriate commit with the version. We can now push the build to the QA repository for bug playtesting, player experience playtesting, and footage recording. Go ahead and perform an SVN commit and the build will be good to go!

QA
Ah, so you’ve been tasked with running a Quality Assurance playtesting session. Well you’ve come to the right place. This doc is all about that QA, all about that QA.
When you first get to the lab, make sure to check in as a developer, and grab a pod. We will be needed 4 xbox controllers, unless otherwise specified. You can get those from the same person you checked in with (the QA manager). Please log on to all the computers in the pod. We will need at least 4 computers. If you intend on watching the play session from and external computer, you will need a 5th computer. If you have not already talked with the team, please inquire into if you are going to be recording the play session, this will be critical for later.
Finding the repo
Once you are logged onto a lab computer, you will need to pull any and all build changes. First off though, we need to find our build repository. This is a special repo, which the QA managers have set up to pull builds from. (This is the same repo which is pushed to when a build is made).
Find the build repo in C:/all2018-2019qa

Navigate to C:/all2018-2019qa/capstone/capstone-2018-19-t5

Observer there are the folders: recorder, playtesting, and a number of MAJOR.MINOR.PATCH folders
Find C:/all2018-2019qa/capstone/capstone-2018-19-t5/recorder/QARecorder-1.0.1.exe

Pull our build
Now that we have found the build repo, we need to grab our latest build. If you don’t know it yet, please check with the team as to the build version that is being tested.
Go ahead and navigate to the QA repo (should be C:/all2018-2019qa) and to our capstone folder (C:/all2018-2019qa/capstone/capstone-2018-19-t5) in File Explorer. Then click on the empty space somewhere, and select the dropdown menu option labeled “SVN Update” (if not, please panic to the QA Manager). This pulls all the build changes for our builds only.

Prepping the Survey
While all the computers are pulling (this may take a couple moments), we can prep the survey form.
In Google Drive, go to the team folder /QA/

Find the form template
Duplicate it

Rename duplicate to S<sprint #>_<day>_Form (i.e. S7_Monday_Form)

Move it to the appropriate sprint folder, or create one

Add the necessary questions (make sure to keep the default questions)

Go to settings -> Get Prefilled Link

Prefill the default questions with “name”, “test”, “tester”, “rec”
Click on Get Link

Click on Copy Link

Paste in temporary txt doc

Replace field values with ${name}, ${test#}, ${tester}, and ${recordingFilename} respectively

Launcher
We are using a special in-house software called the QARecorder. This is used to simplify the developer interactions with testers, and can assist with the recording of gameplay. You can setup the recorder on just one computer (we will setup the others in a moment).
Open the QA recorder exe located earlier
Open the settings

Import C:/all2018-2019qa/capstone/capstone-2018-19-t5/recorder/config.default.json


Paste the new link in the tester section field

Update the name of the application to be “Sprint<sprint>_<day>” (i.e. “Sprint8_Monday”)

Change the paths of the application target to the appropriate version


Tell the QARecorder if you are recording gameplay or not

If you are recording gameplay in this QA session:
Change the recording path to playtesting/<your version>

Add a recording folder for your version

Pushing your configuration
Once you have setup the QARecord on one computer, you easily setup the others. First, we have to get the settings to the repo, so other computers can get it.
Save all settings from the Settings menu in the QARecorder

Click on Export, and select the recorder/config.json in the repository


Go to file explorer and right-click. Then select the option “SVN Commit”

Commit to the svn repo with the commit “Update v<your version> config.json” (make sure you have both the config.json and your new playtesting folder if you made one)

Setting up other computers
Finally, we can setup all the other computers too! You should do the following on all the other computers.
Right click in the QA repo and do another “SVN Update”
Locate and open the QA Recorder
Import C:/all2018-2019qa/capstone/capstone-2018-19-t5/recorder/config.json
Open the settings
Update tester name. This should be unique to each computer. Current standard is Overlord (if watching from a 5th computer), and TesterA, TesterB, TesterC, TesterD.

For the test session, the trial # should always start at 1 - then just make sure all the computers remain in sync at the start of each session (they increment when the reset button is pushed)

Save
Ready to Test!!
Horray! You are ready to start playtesting. Please do a trial run to make sure all settings are as you would like and the recorder does its job. When your trial run is done, please make sure the first round of testers are using Trial/Test # 1 (if you clicked Reset, this number was incremented).
Documentation
Building the Documentation
So, you want to build the documentation, eh? By now I’d assume you’ve made some changes using Creating a Doc as reference (HINT: Make sure you read over it at least once).
How are docs built?
The documentation is stored on GitHub.

When changes are pushed to a branch, ReadTheDocs is notified via a webhook.

When this happens, it pulls the latest changes and builds the documentation internally. That then gets posted to the site you are reading now (unless you have launched the site locally).
Can I view my changes without pushing?
Absolutely! You can use a process called auto-building, which launches the documentation on your computer (only you can see this). When you launch locally, the docs are also automatically built every time you save a file in the repo. This process requires a couple tools, having SourceTree installed (for usage of git-bash), and running some scripts.
- Have Python 3.7+ installed
- Run installSphinx.sh from GitBash
- Run runDev.sh from GitBash
Now, when you save rst files in the docs directory, if you have localhost:8000 open in a web browser, it will automagically update.
Tell me how to publish my stuff for others!!
All you need to publish a document for this site is commit the the docs repo and push your changes to GitHub. This will automatically build the docs that are accessed via the web, and allows others to pull the updates in order to build your changes locally (like any other repository).
Creating a doc
Ah, it is time for you to write your first (or second or third for forty-second) document to add to this repository. We embrace you with open arms (or thoughts if you don’t prefer hugs). By now, it is assumed you have a good understanding of how repositories work.
The documentation repository is actually a submodule of the main project repository. It is found under the /docs/ folder. If you go in here, and look at the index.rst file.
You’ll see something like this:
Welcome to Avarice
===================================
Welcome to the one-stop shop for documentation on Avarice.
What is Avarice?
-----------------------------------
Avarice was/is developed by Ouroboros Creations, which was founded by a small group of seniors at Champlain College.
It is a four-player online or local couch competitive game,in which players compete to collect as much as they can. To collect (points), they must find Greed to become the embodiment of Greed and destroy the world around them. If someone else is already embodying Greed, the three other players must work together to take them down.
Using the docs
-----------------------------------
You can use these docs as a guide to develop content for the game. A good place to start is :doc:`Project Setup </engine/setup>`.
That is an excerpt from the homepage of the documentation! Cool, right?!
All of the documentation follows what is laid out in the ReadTheDocs docs and the reStructuredText primer.
- What kind of documentation are you writing?
Does it have to do with Unreal Engine specifically? Consider sticking it in under /engine.
Is it a tutorial about how to make a specific asset/object or something having to do with the content pipeline? /content would be a great place for it!
Maybe it has to do with the build/packaging process or Quality Assurance testing. If so, consider /builds.
Are you getting meta and using a documentation page to write documentation pages? Woof. /documentation would be a great place for that spooky 4th wall stuff.
Is your doc about team pipelines or resources? /general is probably your place to go.
- Making the doc
Wherever you decide to put it, unless you are making a whole new category, the folder likely already has an index.rst file. This is what tells the html file generator (sphinx) what its table of contents is and the generic details for that category.
In the category folder, you can make your very own .rst file. These special files tell sphinx that it is a file worth looking at. Go ahead and name one in an appropriate manner to what you are documenting (this document is called /documentation/creating.rst).
- What goes in a reStructuredText (rst) file?
First, a header. This is what appears in the sidebar and at the top of a documentation page:
This is my header
===================================
Second, add your content. Use other documents as references and the reStructuredText primer as a guideline.
Third, have fun with it! Documents are meant to be alive. Make them fun, or at least engaging, to read. Otherwise, reading them is a pain is the frickin butt.
Backlog of docs to write
- overview of the gameplay loop
- Making a level
- player spawns & tags
- greed gem spawns & tags
- how does networking work?
- YOGURT & using it
- main menu flow
- pause menu flow
- flow of other menus & how they work
- ui: keybindings menu (control mapping)
- ui: analytics opt-in system